1. 템플릿 엔진(Template Engine)
타임리프에 대해 알아보기 전에 먼저 템플릿 엔진에 대해 알아보겠습니다. 웹 서비스를 만들 때에는 서버의 데이터와 정적자원(html, css, image)을 조합해야 합니다. 서버에서 데이터를 보내 웹 서비스를 만드는 방법에는 크게 2가지가 있습니다.
-
- SPA(Single Page Application)
- 최초 한번 전체페이지를 다 불러오고 응답데이터만 페이지 특정부분 렌더링.
-
- SSR(Server Side Rendering)
- 전통적인 웹 애플리케이션 방식. 요청시마다 서버에서 처리한 후 새로고침으로 페이지에 대한 응답.
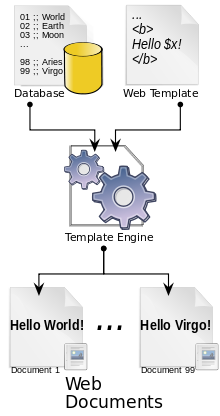
보통 자바에서 웹 개발시 JSP(Java Server Page)를 이용하여 진행합니다. JSP를 사용하면 <% %>형태의 스크립트릿을 사용하여 개발하게 됩니다. 그러나 이 방식은 스크립트릿과 Html이 혼재된 상태가 되고 html태그의 반복적인 사용으로 인해 수정하기 어려운 상황이 됩니다. 이러한 상태를 해결할 수 있는 것이 바로 템플릿 엔진 입니다. 템플릿 엔진이란 html(Markup)과 데이터를 결한한 결과물을 만들어 주는 도구 입니다. 타임리프는 이 템플릿 엔진중 하나 입니다. 스프링 부트에서는 JSP가 아닌 타임리프를 사용할 것을 권장하고 있습니다. 때문에 스프링 부트에서 JSP를 사용하기 위해서는 별도의 설정이 필요합니다.
2. Thymeleaf
먼저 타임리프의 속성들에 대해 알아보고 실습을 진행하겠습니다.
- 표현식
- 변수 : ${…}
- 선택 변수 : *{…}
- 메시지 : #{…}
- Link URL : @{…}
- 리터럴
- 텍스트 : ‘one text’, ‘Another one’,…
- 숫자 : 0, 34, 1.0, …
- boolean : true, false
- Null : null
- token : one, sometext, main, …
- text opeation
- 문자열 연결 : +
- 문자 대체 : |The name is ${name}|
- 연산
- Binary : +, -, *, /, %
- 마이너스 : -
- boolean 연산
- Binary : and, or
- 부정 : !, not
- 비교 연산
- 비교연산자 : >, <, >=, <= (gt, lt, ge, le)
- 균등연산자 : ==, != (eq, ne)
- 조건 연산
- if-then : (if) ? (then)
- if-then-else : (if) ? (then) : (else)
- Default : (value) ?: (defaultValue)
위의 표현식들은 th:attr의 형태로 사용이 가능합니다. attr부분에 적당한 속성을 넣어주면 됩니다.(ex. attr, class, text etc) 위의 표현식과 타임리프의 사용은 실습을 통해서 알아보겠습니다.
실습환경
- Spring boot 2.2.5.RELEASE
maven dependencies
1
2
3
4
5
6
7
8
<dependency>
    <groupId>org.springframework.boot</groupId>
    <artifactId>spring-boot-starter-thymeleaf</artifactId>
</dependency>
<dependency>
    <groupId>org.springframework.boot</groupId>
    <artifactId>spring-boot-starter-web</artifactId>
</dependency>
참고 : thymeleaf와 web을 보면 버전이 없을 것이다. 보통 우리가 의존성(라이브러리)를 추가하게 되면 버전도 같이 추가하게 된다. 위의 두 의존성을 보면 공통점이 있다. starter라는 것이 붙어 있다. 별도로 설정을 변경하지 않았다면 pom.xml에
spring-boot-starter-parent을 볼 수 있을 것이다. 이spring-boot-starter-parent를 상속받아 기본값이 설정된다. 때문에 별도의 버전설정을 하지 않아도 되는 것이다.
목적을 타임리프에 두기 위해 별도의 DB는 사용하지 않겠습니다.
project structure
 템플릿 의존성(Thymeleaf, groovy, FreeMaker)등을 추가하게 되면 스프링 부트는 자동적으로
 src/main/resources/templates경로를 기본 경로로 인식하게 된다. 특별한 사항이 있지 않으면 앞의 경로에 html파일을 만들도록 하자.
template/index.html
1
2
3
4
5
6
7
8
9
10
11
12
13
14
15
16
17
18
19
20
21
22
23
24
25
26
27
28
29
<!DOCTYPE html>
<html xmlns:th="http://www.thymeleaf.org">
<head>
    <meta charset="UTF-8">
    <link th:href="@{/css/index.css}" rel="stylesheet" type="text/css">
    <title>홈페이지</title>
</head>
<body>
    <h1>타임리프 예제 테이블</h1>
    <table>
        <thead>
            <tr>
                <th>번호</th>
                <th>제목</th>
                <th>작성자</th>
                <th>날짜</th>
            </tr>
        </thead>
        <tbody>
            <tr>
                <td>1</td>
                <td>테스트 제목 입니다.</td>
                <td>이종민</td>
                <td>2020.03.12</td>
            </tr>
        </tbody>
    </table>
</body>
</html>
/static/css/index.css
1
2
3
4
5
6
7
8
9
10
11
12
13
14
15
table {
    font-family: arial, sans-serif;
    border-collapse: collapse;
    width: 100%;
}

td, th {
    border: 1px solid #dddddd;
    text-align: left;
    padding: 8px;
}

tr:nth-child(even) {
    background-color: #dddddd;
}
일단 기본적으로 위와 같이 html과 css를 구성했습니다. css는 th:href를 통해서 참조하고 있습니다. URL은 @{..}를 통해서 가져올 수 있습니다. 여러 종류의 URL을 참조할 수 있습니다.
- 절대 URL : http:www.naver.com
- 상대 URL
- 페이지 기준 : user/login.html
- 문맥기분 : /itemdetails?id=3 (서버의 context이름이 자동으로 추가된다.)
- 서버 상대 : ~/billing/processInvoice
- 같은 프로토콜 기준 : //code.jquery.com/jquery-2.0.3.min.js
프로젝트를 실행하게 되면 다음과 같은 화면을 볼 수 있을 것 입니다.

이제 데이터를 넘겨 받기 위한 처리를 하겠습니다.
1
2
3
4
5
6
7
8
9
10
11
12
13
14
15
16
17
public class Board {

    private int no;
    private String title;
    private String writer;
    private LocalDateTime updateTime;

    Board(){}

    public Board(int no, String title, String writer) {
        this.no = no;
        this.title = title;
        this.writer = writer;
        this.updateTime = LocalDateTime.now();
    }

    // getter, setter 생략
1
2
3
4
5
6
7
8
9
10
11
@Controller
public class ThymeController {

    @RequestMapping("/")
    String indexPage(Model model){
        Board board = new Board(1, "테스트 제목", "이종민2");
        model.addAttribute("board", board);
        return "index";
    }

}
간단하게 Controller와 객체를 만들어 봤습니다. controller에서 board객체를 index.html로 넘겨 주기 때문에 값을 출력할 수 있도록 index.html을 수정해 보겠습니다.
1
2
3
4
5
6
7
8
<tbody>
    <tr th:object="${board}">
        <td><span th:text="*{no}"></span></td>
        <td><span th:text="*{title}"></span></td>
        <td><span th:text="*{writer}"></span></td>
        <td><span th:text="${#temporals.format(board.updateTime, 'yyyy-MM-dd HH:mm')}"></span></td>
    </tr>
</tbody>

table의 tbody 부분을 수정했습니다. $로 변수를 가져오고 *를 통해서 선택적 변수를 가져옵니다. 날짜의 경우 LocalDateTime을 변환하기 위해서 temporals개체를 이용했습니다. 이 외에도 다양한 개체들이 존재합니다.
- #dates : java.util.Date를 다루기 위해 사용.
- #calendars : #dates와 비슷하지만 java.util.Calendar를 위해 사용.
- #number : 숫자 객체를 형식화하기 위해 사용.
- #strings : String객체를 위해 사용.(contains, startsWith, prepending/appending 등)
- #objects : 일반적인 객체를 다룬다.
- #bools : boolean을 위해 사용.
- #arrays : 배열을 위해 사용.
- #lists : 리스트를 위한 유틸리티 메소드.
- #sets : set을 위한 유틸리티 메소드.
- #maps : map을 위한 유틸리티 메소드.
- #aggreates : Array 또는 Collenction에서 집계를 위한 메소드.
- #ids : 반복될 수 있는 id 속성을 처리.
반복문
이제 for문에 대해 알아보기 위해 데이터를 추가하겠습니다.
1
2
3
4
5
6
7
8
9
10
11
12
13
14
15
16
17
@RequestMapping("/")
String indexPage(Model model){
    Board board1 = new Board(1, "테스트 제목1", "이종민1");
    Board board2 = new Board(2, "테스트 제목2", "이종민2");
    Board board3 = new Board(3, "테스트 제목3", "이종민3");
    Board board4 = new Board(4, "테스트 제목4", "이종민4");
    Board board5 = new Board(5, "테스트 제목5", "이종민5");
    List<Board> boards = new ArrayList<>();
    boards.add(board1);
    boards.add(board2);
    boards.add(board3);
    boards.add(board4);
    boards.add(board5);

    model.addAttribute("boardList", boards);
    return "index";
}
1
2
3
4
5
6
7
8
<tbody>
    <tr th:each="board : ${boardList}">
        <td><span th:text="${board.no}"></span></td>
        <td><span th:text="${board.title}"></span></td>
        <td><span th:text="${board.writer}"></span></td>
        <td><span th:text="${#temporals.format(board.updateTime, 'yyyy-MM-dd HH:mm:ss')}"></span></td>
    </tr>
</tbody>
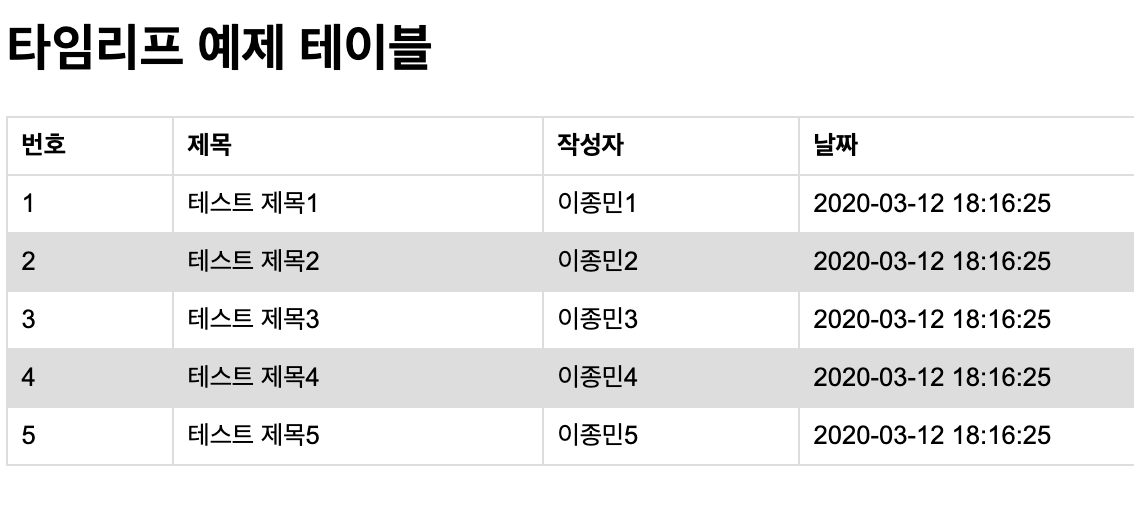
데이터베이스를 사용하지 않기 때문에 값을 List에 담아서 넘겨주었다. tbody부분에서 boardList에 담긴 것을 foreach형태로 꺼내서 반복 출력한다. 결과는 다음과 같다.
 지금은 Board객체에 no가 있기 때문에 번호를 출력해주지만 for문 처럼 숫자를 증가시키고 싶으면 다음과 같이 하면된다.
1
2
3
4
5
6
7
8
<tbody>
    <tr th:each="board, iterState : ${boardList}">
        <td><span th:text="${iterState.index}"></span></td>
        <td><span th:text="${board.title}"></span></td>
        <td><span th:text="${board.writer}"></span></td>
        <td><span th:text="${#temporals.format(board.updateTime, 'yyyy-MM-dd HH:mm:ss')}"></span></td>
    </tr>
</tbody>
index는 0부터 시작하는 색인이다. 1부터 시작하고 싶다면 count를 사용하면 된다.
조건문
조건문에는 if, unless, switch, case가 있습니다. unless는 if문의 반대이고, switch~case는 자바와 동일하게 생각하시면 됩니다. if문을 이용해서 번호가 홀수 일때만 출력하도록 하겠습니다.
1
2
3
4
5
6
7
8
9
10
<tbody>
    <tr th:each="board, iterState : ${boardList}">
        <div th:if="${iterState.count} % 2 != 0">
            <td><span th:text="${iterState.count}"></span></td>
            <td><span th:text="${board.title}"></span></td>
            <td><span th:text="${board.writer}"></span></td>
            <td><span th:text="${#temporals.format(board.updateTime, 'yyyy-MM-dd HH:mm:ss')}"></span></td>
        </div>
    </tr>
</tbody>
 결과를 확인해 보시면 홀수번호만 출력되는 것을 확인하실 수 있습니다.
switch~case는 아래와 같은 형태로 사용이 됩니다.
1
2
3
4
<div th:switch="${user.role}">
  <p th:case="'admin'">User is an administrator</p>
  <p th:case="#{roles.manager}">User is a manager</p>
</div>
이 외에도 fragment, block 등 다양한 사용법이 존재합니다. 더 많은 사용법이 필요하시다면 thymeleaf 공식 홈페이지를 참조하시기 바랍니다.
참고
- thymeleaf reference
- 스프링부트로 배우는 자바 웹 개발 (저자 : 윤석진)
